I was recently working on a project where I needed to have a bouncing karaoke ball. I thought the solution was interesting and useful enough to post here, so here we go.
First of all, I need to point out that there is a script that is supposed to help with this. It’s the PT_SSAKaraokeAnimator from aescripts.com. It looks very good and very powerful. I played with the demo a bit, but I couldn’t get the bouncing ball to work because I got so frustrated getting the karaoke timings to work in the Mac version of Aegisub, I gave up. They say that the Mac version is an alpha, and it’s definitely true. There’s some sort of bug in the zooming tools in the GUI where they don’t work or show up and it makes it impossible to zoom into the audio waveform close enough to be able to chop it up word-by-word, which you need to do to get karaoke timings, which you need to get the bouncing ball in the KaraokeAnimator script. That said, if you have a karaoke file or can create one somehow, that script is almost definitely the way you want to go, because, while the method I’m going to describe below makes it much easier than it otherwise would be to animate a ball, it’s still a pretty tedious process and the KaraokeAnimator script should automate the whole thing.
Here’s what we’re going to make:
I’m going to assume that you already have a comp set up that has all the titles placed and timed along the bottom of the screen. At this stage, all you need to do is add the ball and animate it. The setup is a bit convoluted with an expression that’s kind of scary looking, but it’s really not that difficult and it saves a lot of time. The thing that makes this solution interesting and worth sharing is that you only need one keyframe per word (I’m going to say word here, but you could also substitute “syllable” if you need to be that precise). If we were just animating this stuff without the automation I’ll discuss below, we’d set a keyframe to get to the next word and another keyframe when we’re ready to move again, not to mention all the keyframing we’d have to do to make it jump from one word to the next. This eliminates all of that. All you have to do is set one x-position keyframe at the time you want the ball to arrive at a word. Without any further ado, we’ll dive in…
I’ve got a comp set up with some audio and some lines of text. First, I create a bouncing ball, which in this case is just a circle shape. I’ve called it “Ball.” You could also use a custom graphic. Life will be easier if the anchor point is in the exact center of the circle and if you create the circle in the middle of the comp. There might be a faster way to do this, but what I did was got to “Layer>New>Shape Layer.” Then, I expanded the layer in the timeline and clicked on the “Add” submenu and added an elipse. I then used the same add menu to add a fill, which I made yellow. I used the “Size” property under “Elipse Path 1″ to set it to the size I wanted instead of using the scale property. We’re going to use scale later, so it’s better to leave this untouched. Before I move the ball anywhere, I’m going to create a new null object and call it “Ball Parent.” Then, I parent the “Ball” shape to “Ball Parent.” A little later, the shape is going to bounce up and down in rhythm with the music and “Ball Parent” is going to control the motion of going from word to word. I’m not 100% sure it’s necessary, but it’s a lot easier if “Ball” and “Ball Parent” are in the same position when you do the parenting. That’s why I went through all the effort earlier to create the shape in the exact center.
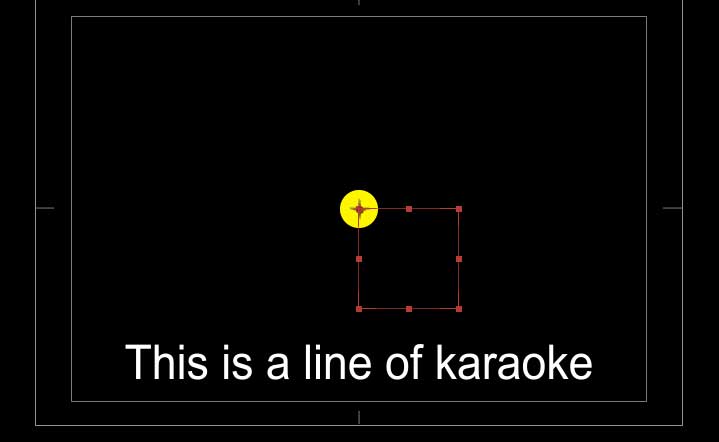
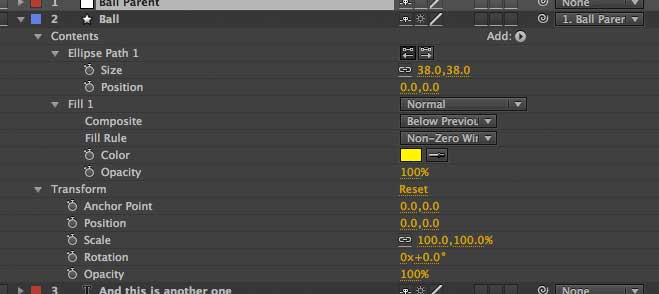
You should have something that looks like the picture above. You can now adjust the “Ball Parent” position to move it above the text. The expression we’re going to write in a moment is going to make it move slightly lower than it is now, so be sure to leave a little extra space above your text for that.
We’re going to create another null object now. This is the first one where the name is important. You should call it, “Word Locator” (no quotes, and this is case sensitive). The horizontal position of this null object is going to determine what word the ball is over. This is the only layer that’s going to need keyframes. I should note that this layer doesn’t have to be a null object. If it helps you align it with the words better, you can use a solid or a shape or something, just remember to hide it when you render or make it a guide layer. But whatever object you use, it has to be named “Word Locator” and you just need to be aware that the horizontal position of the anchor point determines where the ball is located. For now, we’ll position this null over the center of the first word. The vertical position doesn’t matter, but it’s easiest, in my opinion, if it’s over the word.
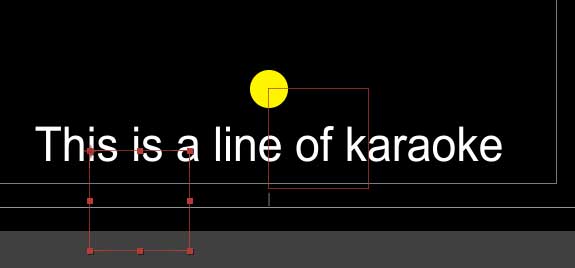
Time to create one last null object. We’ll call this one, “Controller” and, again, the name matters, so omit the quotes and use the same capitalization I’m using. There are a bunch of slider expression controls that need to be applied to this null, and rather than walk through setting up all of them and possibly messing things up if there’s a typo in the name, I’m going to link here to an animation preset that you can download. With the Controller layer selected, go to “Animation>Apply Animation Preset” and then find the file. You can also drag the preset into your preset folder and it will be present in the effects panel. See the Adobe documentation for the location of your preset folder for your operating system and AE version.
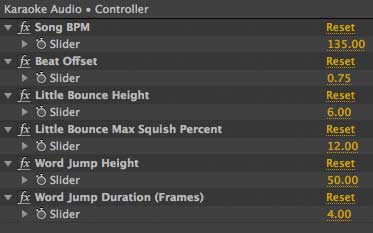
Here’s a rundown of what the different parameters mean.
- Song BPM: Number of beats per minute in the song. The ball is always bouncing a little bit and the rate it bounces is determined by the song BPM. You can find the BPM of a song either by looking in a database or by using a tool like this one, which allows you to tap the spacebar along with a a song and it will calculate the BPM for you.
- Beat Offset: This is also related to the ball’s dancing. It’s possible that you have the BPM right but the rhythm of the ball is a little bit off. Maybe its not hitting the ground right on the beat. You can use this slider to adjust where the beats hit.
- I should note that you could probably hack some of my code to do automatic beat detection and eliminate the need for these first two parameters. I didn’t bother with that, but it’s certainly a possibility. Check out Dan Ebberts’s expression here or Red Giant’s Sound Keys plugin. Moving on…
- Little Bounce Height: This is how many pixels up and down the ball will move when it’s bouncing to the beat. Bear in mind that from the original position of the ball (where it is right now), it’s going to move both this many pixels up AND this many pixels down.
- Little Bounce Max Squish Percent: As the ball lands from its bouncing, it can squish a little and it can stretch a little when it gets to the top of its bounce. This parameter determines how much it will do each of those things. For the default value of 12, when it hits the ground, its scale will go from [100,100] to [112, 88] and, at the top of its bounce, it will be [88,112].
We’re almost ready to start animating. We need to add all the expressions first. Option-click on the position property stopwatch of the Ball layer and paste in the following:
This is the code that bounces the ball up and down. Next, option-click on the stopwatch and paste the following code into the ball’s scale property. This makes the ball squish and stretch as it bounces:
The code is very similar between these two, it’s basically doing the same math but changing one to scale and one to position.
Now it’s time to paste in the main expression. It’s quite long, so I’m not really going to explain it here, but I put in a lot of comments if you want to dissect what it’s doing. Basically, it tracks the position of the Word Locator object and if it finds that it’s within range of a keyframe to move to the next word, it begins that animation. Option-click on the stopwatch next to the position property of the “Ball Parent” layer and paste in the following:
Now, it’s time to animate. So, let’s get to it. First, we’ll notice that in this particular comp, there’s a bit of silence before the word comes in, so I’ll set my first keyframe on the first frame and have the ball start offscreen. I’ll adjust the position property of “Word Locator” so that it’s offscreen left and then I’ll set a keyframe. I’ll then right-click on that keyframe and go to “Keyframe Interpolation” and change the interpolation from “Linear” to “Hold.”
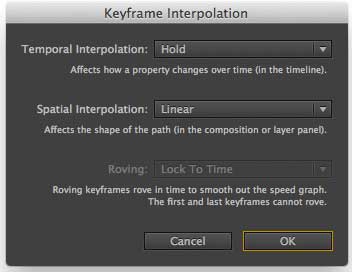
I can hold down command (probably control on PC, but I’m not positive) and drag the playhead around. This will play the audio as I scrub through and I can listen for the beginning of the first word. When I hear it, I can just drag the Word Locator position until it’s centered on that word. I can keep going through the line like that. If there are times when there are no titles on the screen, I can drag the position all the way off the right side of the screen and then drag it back to the first word of the next title when that appears on the screen. If I don’t want to see the ball come back across the screen and instead, want it to go off the right side and then re-appear from the left side, I can set the keyframe as usual on the right side and then, shortly after, set a keyframe on the left side. If, on that same frame, I add a keyframe to the opacity property (the value of the keyframe doesn’t matter) of the “Word Locator” layer, the expression will know to just jump to the position keyframe at that frame rather than animate to it. That may sound confusing, but you can try adding and removing the opacity keyframe in the sample project and see that it’s pretty easy.

And that’s about it. After I set all of this up, I was able to go through all the lines of karaoke text quite quickly. Hopefully it can save you time, too. I’m including a link here to the sample project I was working in and also, once more, a link to the animation preset. Enjoy.
This is an incredible thing. I’m not even an hour into my project and I’ve got an amazing bouncing ball. You are a gentleman and a scholar.
Hi, just wanted to say thanks for this really helpful tutorial. This helped me a lot with my project. I also tried SSA Karaoke first but that didn’t work for me as I was doing Arabic Karaoke. But your expressions work like charm.
Thanks Again. Stay Blessed
Thank you, David! This is saving me a lot of time and it works very well 👍
Thank you so much! I had some trouble at first, but then I realized that I have to set my after effects to English. Now it worked just fine!